HP Reverb G2 - Improvements
I recently bought the HP Reverb G2 as a replacement for the Oculus Rift CV1. I had many thoughts comparing these two headsets. While the Reverb G2 has many great aspects, it also had some issues that I needed to fix if I was going to use it for an extended amount of time.
First and foremost, it wasn't comfortable to wear. It's very difficult to get immersed in VR if your head hurts from wearing the headset. This was largely due to the face gasket simply being too narrow. Secondly, the FOV and sweet spot were noticeably small. The sweet spot was bad enough that it became a distraction in many games. The limited FOV was less of an issue, but was a disappointment even compared to the Rift CV1. Much less severe problems were the audio, the cable and some software compatibility issues.
Thankfully, I was able to fix a lot of these problems quite easily. Not everyone is going to have the same problems I did as much of it is specific to each user and environment, but these solutions might be useful nonetheless.
Replacement Face Gasket
The comfort, FOV and sweet spot issues are all caused by the Reverb G2's face gasket. Its elongated, narrow shape simply squeezes too hard on the side of my head to be usable for long durations. Watching a two hour movie was very difficult. Similarly, its thickness, which may be nice if you wear glasses, keeps your eyes far away from the lenses. It's this distance that causes the FOV and sweet spot issues.
To fix all these issues, I ordered the replacement gasket made by 3DwardPrinting. This is a much thinner, 3D-printed gasket that has a wider shape, much like the Rift CV1 gasket. I ordered it with a removable 12mm Vive Pro foam pad, which I wouldn't recommend (more on that later).
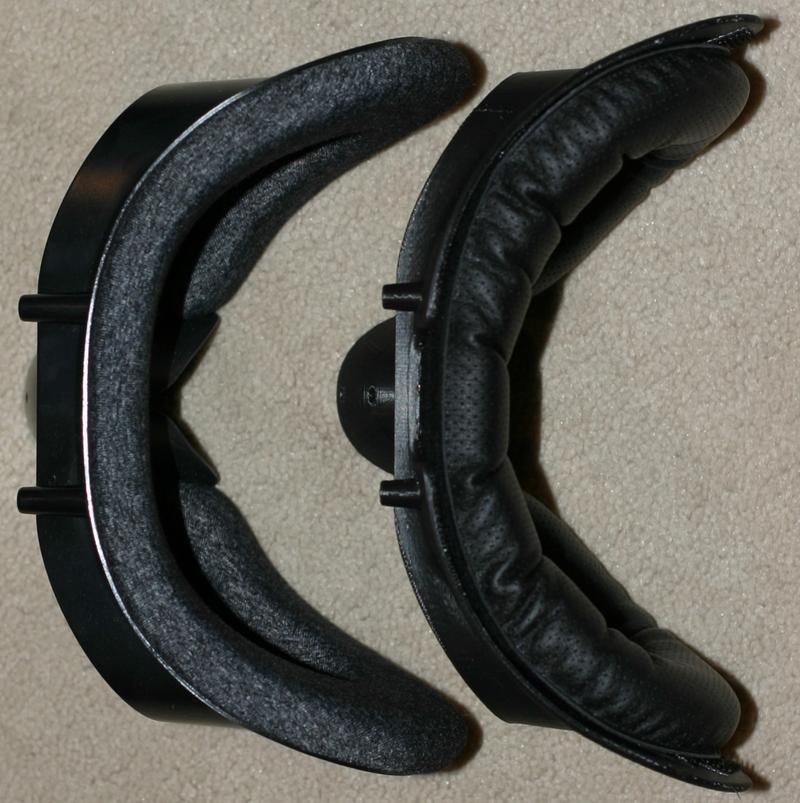
Most importantly, this gasket entirely fixes my comfort issues with the headset. Getting rid of the elongated sides made a huge difference. With nothing squeezing the sides of my head, I can comfortably wear this headset for several hours.
The FOV noticeably improves by a few degrees with this replacement. Whereas the original was a little worse than the Rift CV1, this is now a little bit better. It's still not a great FOV compared to some other headsets, but it's not terrible.
The sweet spot is now a non-issue as far as I am concerned. It increases the size of the sweet spot just enough so that you don't notice it nearly as much. It's a much more natural viewing experience.
The blurring and chromatic aberration are still there, but they are pushed far enough out of the center of your vision to not be so distracting. As before, the most annoying spot is when you look down toward HUD elements. It's certainly not perfect, but it's good enough that I can live with it now.
My eyes are so close to the lenses that I see the edges of the screens in my peripheral vision. I heard this could happen, but didn't really know what that would look like. It's not just a straight edge. Instead, they appear as curves along the left, right, top and bottom of your peripheral vision. Depending on what is on the screen, this can be a little distracting. I have read some people are really bothered by them, but I don't mind it very much. Most of the time I don't even realize they are there.
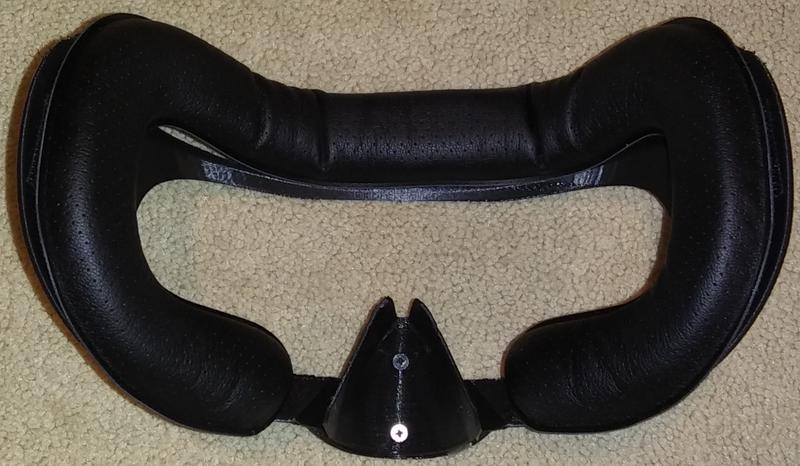
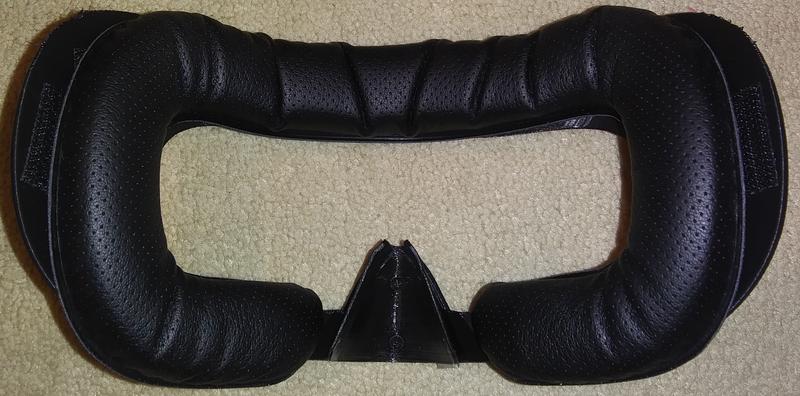
This gasket has a few issues. While it does have magnets, they are not very strong, so you have to be careful that the gasket doesn't fall out when you take the headset off.
The bigger problem is the 12mm Vive Pro foam pad itself. I wouldn't recommend this. There is a lot of light leakage around the nose, since the Vive Pro foam isn't quite the right shape to block out that area. The pad was also just a little too thin, causing the bridge of my nose to hit the headset at times.
Instead, I ordered an 18mm replacement face pad for the original Vive. The shape of the original Vive foam stops most of the light leakage. There is still a little bit if you look straight down your nose, but it's very small. You could easily add a little piece of foam to close it off completely if you really wanted to. That little extra padding was enough to stop my nose from hitting the headset, without affecting the FOV or sweet spot much at all.
All said and done, the headset is now very comfortable. It doesn't squeeze the side of my head, the FOV is actually better than the CV1 and I don't even think about the sweet spot anymore.
Audio Fix
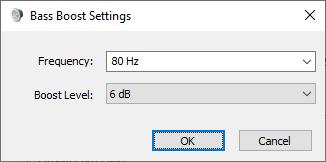
Originally, I had mixed feelings about the audio of the Reverb G2. While the sound had great clarity, it was notably lacking a strong bass response and the treble was quite tinny.
Rhythm games, or anything else where music is the main attraction, were disappointing. Similarly, watching movies wasn't very nice. The visuals obviously looked great, but when the sound is lacking, you're taken out of the experience.
There's not much you can do about the tinniness, but you can largely fix the bass problem.
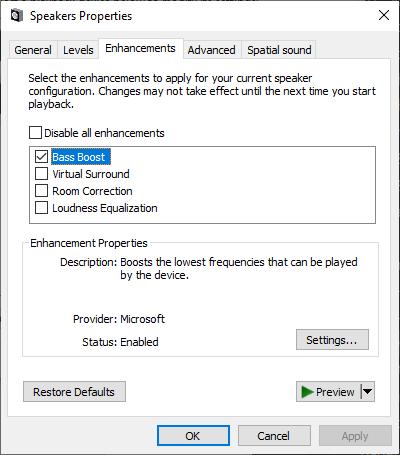
- Open the Sound Control Panel, select the Reverb G2's audio output ("Realtek USB2.0 Audio").
- Go to Levels and enable the Bass Boost.
- Click on Settings to adjust the amount of boosting. (optional)
I was not expecting a whole lot from simply applying a bass-boosting equalizer to the audio output. If the speakers can't reproduce the sound, boosting the EQ isn't going to do much of anything. To my surprise, however, this worked very well.
The bass response is much better. It now sounds much closer to the Rift CV1 in terms of the balance between treble and bass. The treble is still tinny, but it's less noticeable with the improved bass. In general, I don't like having to resort to these kind of equalizer tricks, but these speakers really need it.
Cable Fix
The cable for the Reverb G2 is quite heavy and doesn't slide across carpet. This makes it very easy for it to get wrapped up around your feet. This was even a problem when playing seated, as the cable would drag on the back of the chair, making it difficult to look around freely. The obvious solution is to find a way to get the cable off the floor. I'm not going to install any pulleys in my ceiling for this, nor do you need to.
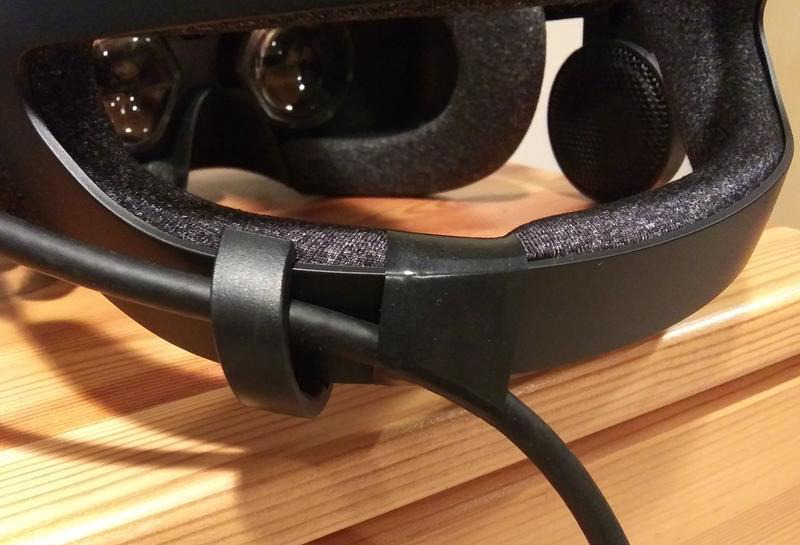
The first thing I did was use some electrical tape to make the cable drape down from the middle of the headset. This is not only more comfortable, but should extend the life of the cable by removing the pressure on the plastic clip. This was a common point of failure for the cable of the Rift CV1, and likely will be for the G2 as well.
When playing a mostly stationary, standing game, the easiest way to handle the cable is to lay it on the floor at the very back of your playspace and then step forward into the center. Since the cable doesn't move much on the floor, it will now be pulled at angle away from the back of your head down to the floor behind you. It shouldn't fall straight down your back. This works surprisingly well at keeping the cable from being a bother.
I use this same idea when playing seated games. I make sure the cable runs back behind the chair as far as possible. This keeps the cable from dragging on the back of the chair, providing resistance when you try to look around. As long as I do this, I hardly feel that there is a cable attached at all. This will obviously depend on the kind of chair you're sitting in, but it should work for most that don't have a very high back.
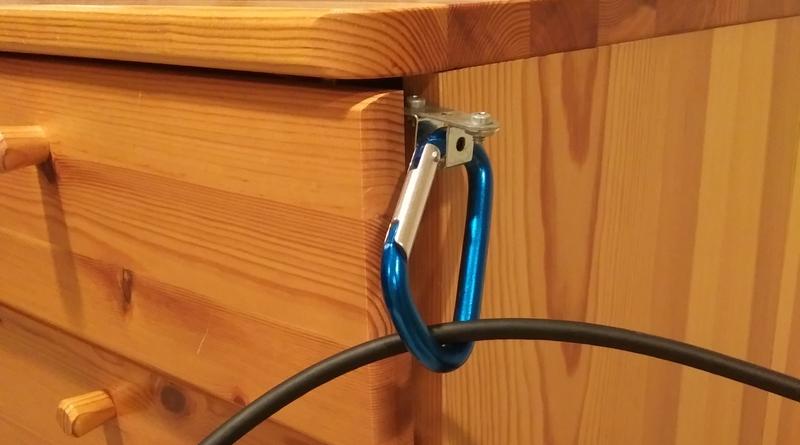
For games that are more active or require turning around, you're going to need a little more advanced set up. You need to create a way for the cable to be suspended off the floor. I use a carabiner clipped onto the side of my desk using a bracket wedged in the drawers. This is enough to get the cable off the floor, which significantly improves the feel.
Software Issues
I've actually been pleasantly surprised with the Windows Mixed Reality software experience. I know many people haven't been so lucky, but I haven't had any issues with the headset connecting to the computer or forgetting the boundaries. As a matter of personal preference, I find the Cliffhouse a much better VR hub than either SteamVR Home or Oculus Home.
But there have been some software issues. I discovered a few tricks that weren't immediately obvious and have found some very helpful software to deal with the performance issues and some software incompatibilities.
WMR Controller Shortcuts
To turn on the flashlight:
Hold down the Windows button, then press the grip button and release the Windows button to turn on the flashlight for that controller. This lets you see your real world surroundings.
To take a screenshot in VR:
Hold down the Windows button, then press the trigger button and release the Windows button to take a screenshot. These will be saved in your Pictures\Camera Roll folder.
Frame Rate Issues
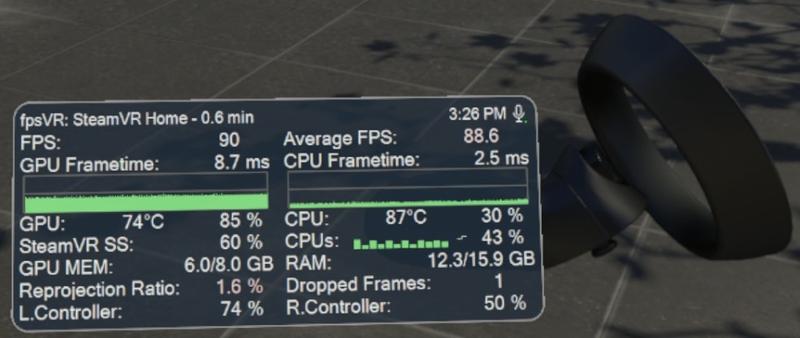
One of the big issues with the Reverb G2 is that it is such a demanding headset because of its high resolution screens. Nearly every game needs to have its resolution scaled down to be played at a decent framerate on my PC.
I highly recommend buying fpsVR on Steam. This app makes it simple to see the framerate, GPU usage, CPU usage and a bunch of other useful info for any SteamVR game.
I set SteamVR > Settings > General > Render Resolution to 100% (3164 x 3096) and rely solely on the Custom Resolution Multiplier to adjust a game's resolution.
fpsVR makes it very easy to adjust this multiplier, check the framerate and see if the bottleneck is caused by the GPU or the CPU. I have it configured so it shows the information on my left wrist, making it very easy to see at a glance what's happening. Once I get the settings correct, you can hide the panel very easily as well.
Controller Rotation Issues
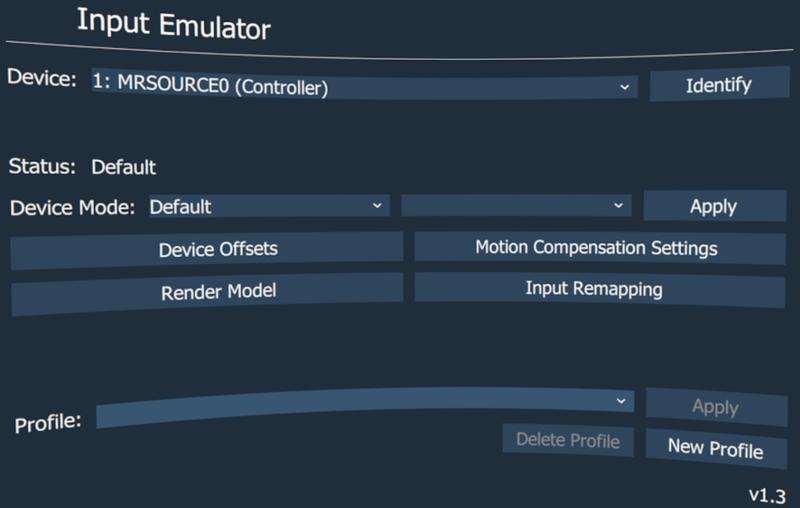
In some titles, the controller's "pointer" direction is angled very awkwardly. Presumably these games were designed for the Vive Wands specifically.
In these games, the pointer comes out from the top of the controller, towards the ceiling, rather than in a forward direction as you would expect. In a game like Rez Infinite, this makes the game very difficult to play comfortably.
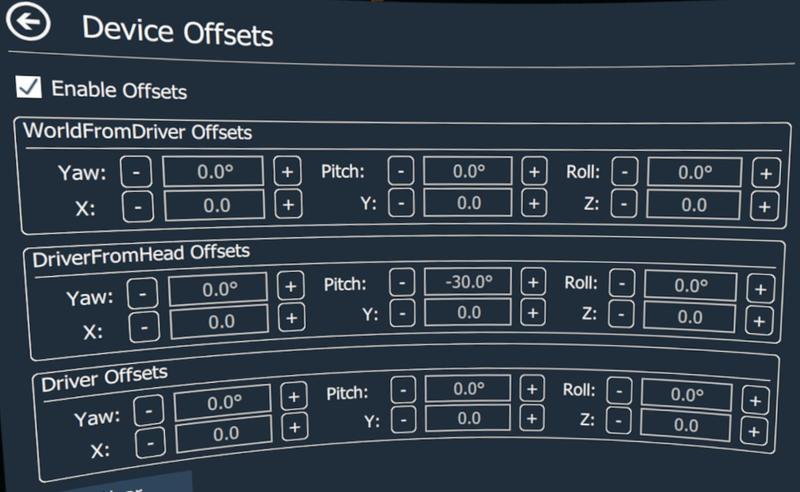
Thankfully, there is a software fix for this. OpenVR Input Emulator is a free app for SteamVR that lets you easily fix the rotation and position of your controllers. To fix this pointer problem, I just lower the controller Pitch value by 30.
Select a controller, click on Device Offsets and use these values under DriverFromHead:
| Setting | Value |
|---|---|
| Enable Offsets | Checked |
| Yaw | 0 |
| Pitch | -30 |
| Roll | 0 |
Different games might need different values, depending on how the game is designed.
Revive
If you came from an Oculus headset like I did, you likely have some apps that only exist on the Oculus store. These won't work without using Revive, a free program that allows Oculus-native apps to run in SteamVR.
This has worked remarkably well. It's not compatible with every single game, but they do have a compatibility list, so you can check if a game is known to work before buying anything from the Oculus Store.
Revive adds a new section in your SteamVR overlay menu where you can see all of the titles in your Oculus library. You can launch them directly in SteamVR as you would a native game.
WMR Tray Tool
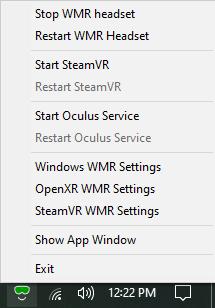
WMR Tray Tool is another free app that sits in your system tray that makes it easy to start and stop the WMR, SteamVR and Oculus runtime services. This works well with Revive. I don't want the Oculus software running all the time, it wastes resources and can even confuse certain games. With the WMR Tray Tool, I can start the Oculus Service directly, only when I want to launch a Revive title and easily stop it when I'm finished.
Conclusion
All of these improvements have made the Reverb G2 a much better headset overall. There is still no way to fix the disappointing controller tracking, which is now the biggest problem I have with the headset. It's fine for most games, but you are constantly having to deal with it.
If the next generation of the Reverb solves the controller issues and improves the FOV a little bit, it could be the best overall headset on the market. Here's hoping that HP is listening to this feedback and solves all of the issues in their next headset.
Let me know if you have any questions or comments.
