Best Assetto Corsa Settings for Thrustmaster TMX / T150
Assetto Corsa is a great game to play with a force feedback wheel. When you are trying to drive at the limit of grip, every little bit of information transmitted through the wheel is important. But for the Thrustmaster TMX and T150, the experience can be improved quite a bit by calibrating the wheel's force feedback response.
The Assetto Corsa series supports using a LUT to calibrate your wheel's force feedback response. When playing on a lower end wheel, this quite drastically improves the force feedback. Additionally, we can use an in-game app called FFBClip to automatically set the strength of the wheel. This makes it easy to switch to different types of cars without having to adjust the strength manually.
In this guide, I will show you how easy it is to calibrate your wheel and improve the driving feel on these wheels.
Wheel Calibration
A LUT (Look Up Table) is a file created by a wheel calibration tool. A series of tests is run that sends a certain force to the wheel and measures how far the wheel actually moves. This data gets recorded in a LUT file. A simulator like Assetto Corsa can use that data to send a calibrated force to the wheel to make it move the intended amount based on the physics simulation. Without the LUT, most forces will either be too strong or too weak, depending on the wheel mechanism, and not accurate to the simulation.
Create LUT File
Downloads
You will need to download two programs to create a LUT file:
- WheelCheck is an application that tests your wheel's force feedback response.
- LUT Generator for AC converts the data from WheelCheck into a LUT file that Assetto Corsa can use. You will need to sign up for a free account on Race Department to download this. On the Register page, scroll all the way down to the bottom to create a free Basic Account.
Wheel Check

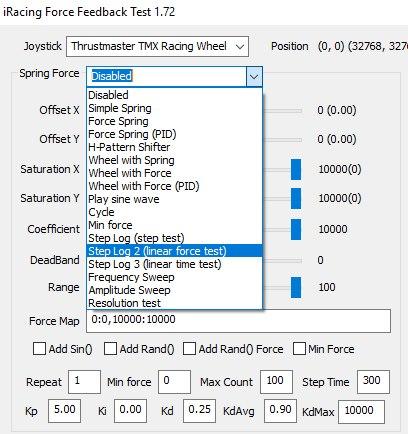
Wheel Check is a tool from iRacing that calibrates your individual wheel. It's a very simple process:
- Run WheelCheck.
- Set the Max Count to 100.
- In Spring Force, select "Step Log 2 (linear force test)". This starts the calibration process.
Your wheel will start moving in increasingly larger motions. Don't touch the wheel during this process! This process compares the amount of force the computer sends to the wheel to how much the wheel actually moves.
Once it finishes, it creates a file called something like "log2 2021-04-29 22-04-08.csv" in your Documents folder. We will give this file to LUTGenerator in the next step.
LUT Generator

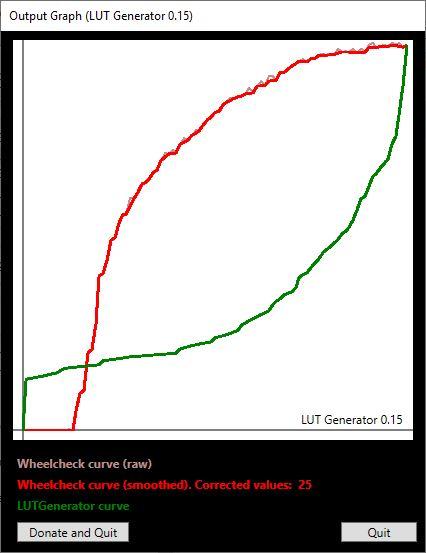
Run LUTGenerator and open the csv file that was just created by WheelCheck. This will create a LUT file that Assetto Corsa can use to calibrate the force feedback. Save this file to:
Documents\Assetto Corsa\cfg\myLut.lut
LUTGenerator displays a graph that shows the raw data in red and the new curve in green. You can see how the green curve compensates for the red to create an ideal linear response.
Assetto Corsa
Finally, to tell Assetto Corsa to use this file, create a new file in Notepad and paste in the following text:
[HEADER]
VERSION=1
TYPE=LUT
ENABLED=1

[GAMMA]
VALUE=1

[LUT]
CURVE=myLut.lut
Save this file as Documents\Assetto Corsa\cfg\ff_post_process.ini. With these files in place, Assetto Corsa will use your calibrated wheel data when calculating the force feedback and you will notice a big improvement right away.
Content Manager
If you are using Content Manager instead of the default Assetto Corsa launcher, you no longer have to modify the ff_post_process.ini file at all. In Content Manager, go to Settings > Assetto Corsa > Controls > Force Feedback. Make sure “Enable FFB post-processing” is checked, then set the Mode to LUT and choose the myLut.lut file.
I recommend saving these settings as a preset, as I have had Assetto Corsa forget all the wheel bindings for no apparent reason in the past.
Now that the force feedback response has been calibrated, let's look at the available force feedback settings.
Thrustmaster Control Panel Settings
Assetto Corsa automatically sets the proper steering angle for each car, so it is best to leave the rotation set to the maximum in the Thrustmaster Control Panel.
| Setting | Value |
|---|---|
| Rotation | 900° (TMX) 1080° (T150) |
| Overall Strength of all forces | 100% |
| Constant | 100% |
| Periodic | 100% |
| Spring | 100% |
| Damper | 0% |
| BOOST | Off |
| Auto-Center | by the game |
Spring is not used by Assetto Corsa, so the value actually doesn't matter. I leave it at 100% since it is important in other games.
Damper is used by Assetto Corsa to add weight to the wheel, most noticeable when the car is stopped. I turn this off since these wheels have a lot of natural dampening.
BOOST should always be turned off. For an in-depth look as to why, see my BOOST Force Feedback Analysis.
Assetto Corsa Settings
In Options > Controls > Advanced > Steering Settings:
| Setting | Value |
|---|---|
| Gamma | 1.00 |
| Filter | 0.00 |
| Speed Sensitivity | 0.00 |
In Options > Controls > Advanced > Force Feedback:
| Setting | Value |
|---|---|
| Gain | 100% |
| Filter | 0% |
| Minimum Force | 0% |
| Kerb Effect | 0-10% |
| Road Effect | 0-10% |
| Slip Effect | 0-10% |
| ABS Effect | 0-10% |
| Enhanced Understeer Effect | Disabled |
| Half FFB Update Rate | Disabled |
The Kerb, Road, Slip, ABS and Understeer effects are personal preference. They are designed to give you feedback about the car, but they are not things you would actually feel through a steering wheel. Try turning them all off and then just add a little to each one to find what you like. I personally like the Kerb and ABS effects because it gives me a little extra feedback.
Gain is the overall strength of all forces. Leave this at 100%. The FFBClip app will adjust the gain automatically as you drive.
Filter smooths out spikes in the force feedback. I don't find this necessary on these wheels.
Minimum Force raises the lightest forces to a level where they can be felt on these wheels.
Kerb Effect vibrates the wheel when you run over a kerb. This is a canned effect that adds a vibration for every kerb and even when you run off into the grass. With this set to 0%, you will only feel the bigger kerbs that actually effect the physics of the car. Even though it's not realistic, I like this effect, but that is a personal preference.
Road Effect is the vibration felt based on the road surface. If you use this at all, I would set it no higher than 10%. Setting it much higher than that feels unnatural and can get very annoying.
Slip Effect vibrates the wheel when you lose traction. I find this more distracting than anything, so I turn it off completely.
ABS Effect vibrates the wheel when ABS engages. Setting this too high can be more distracting than it's worth.
Enhanced Understeer Effect lightens the wheel to a higher degree during understeer. This feels unnatural to me, so I turn it off.
Half FFB Update Rate causes the force feedback calculations to run on every other frame. This could help your frame rate on older computers.
FFBClip Settings
Download and install the in-game app FFBClip using the instructions on that page.
To get the most information from the wheel as possible, you want to make sure the game never sends more power than the wheel is capable of handling. This is called clipping. In the previous step, we set the Force Feedback Gain to 100%. Left at this, the forces would clip constantly, making the wheel feel terrible.
The FFBClip app automatically adjusts the force feedback gain level as you are driving to maximize the forces without clipping. Turn down the FFBClip strength setting to 90 and then adjust it to your preference for a lighter or heavier feel.
During your first lap or two, you will notice the force feedback change as it sees the power clipping, but it will even out as it dials in on the best setting. Once it settles in to a feeling you like, just hide the app and it will no longer update (as long as "Run in Background" is unchecked.)
There is a Dynamic Mode in the app that tries to maximize the forces at all times. On a straight, it will raise the force feedback levels and then drop them in a corner where the forces are very high. I find this more distracting than helpful, so you should try turning it on or off to see which you prefer.
What is all of this doing?
Force feedback is actually handled very much like an audio system. The louder the signal, the harder the wheel will turn. The game calculates the forces assuming that the wheel can “play back” the exact signal it gets, very much like a speaker. Very expensive direct drive wheels can do exactly that, letting you feel all the tiny little details that get lost on lesser equipment. Cheaper wheels have a very poor ability to accurately reproduce the signal, much like a speaker with very poor bass response.
When you calibrate the wheel and create the LUT file, you have a measurement of how the wheel actually responds to the signals it gets. In this way, the LUT acts like an equalizer on a stereo to make up for its weaknesses. Using the LUT, Assetto Corsa can adjust the signal levels sent to the wheel to make it move the intended amount. It’s a pretty clever solution to improve the feedback on cheaper wheels.
Continuing with the audio analogy, the FFBClip app with Dynamic Mode on is acting as a dynamic range compressor. It raises the quiet parts and lowers the louder parts to overcome the inherent limitations of these weaker wheels. With Dynamic Mode turned off, it is simply lowering the overall "volume" until the forces never clip, even when they are at their "loudest."
FFBClip isn't directly related to the LUT; you can use either one without the other, as they operate at different points in the calculation of the final force that is sent to the wheel. When used together, they provide a lot more useful information that you can actually feel through the wheel.
Conclusion
The first time I set this up, I couldn't believe how much better the wheel felt. You'll get a better feel for what the car is doing and, as such, may find it easier to catch slides and improve your lap times.
Let me know if you have any questions or comments.